Account and Users Management
Account Management for Geti™ On-Premise
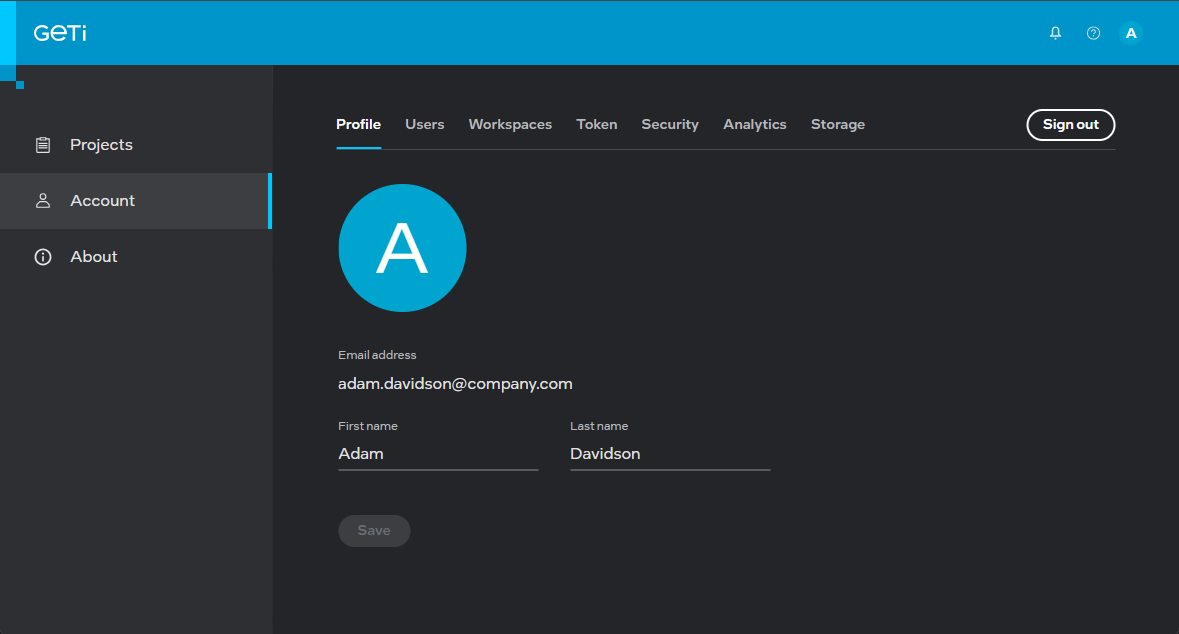
In the Account section, you will see the following tabs:
- Profile - update your full name and profile picture
- Users - see who you are working with
- Workspaces - see the workspaces you have access to
- Token - get a token that allows you to programmatically interact with the REST API
- Security - change your password
- Analytics - collect and extract data about user behavior
The Profile tab allows you to update your full name and profile picture. The system automatically creates a profile picture from the first letter of your name but you can also upload your own image. Once you upload your image, you cannot remove it, however, you can always replace it with a different image.
The Users tab allows you to search for users, invite users, see their details including status.
The Workspaces tab allows you to see the workspaces you have access to. You can also create a new workspace and manage it - add/delete users to a workspace - if you have the admin privilege in your organization.
The Token tab allows you to generate a token that is a password alternative for authentication to the platform when you use the Geti™ API. When you create the token, a dialog box will prompt you to specify an expiration date for the token.
After selecting the date, copy the token and save it in a safe place. After closing the dialog box, you will not be able to retrieve your Personal Access Token.
The Security tab allows you to set a unique password to protect your personal Geti™ account. Note that for security reasons, the password has to consist of 8 to 200 characters, has at least one capital letter, one lower case letter, and a number or a symbol.
The Analytics tab allows admin users to upload and analyze telemetry data such as GPU and CPU time, storage, services running, jobs, logs, traces and metrics. It also provides project statistics such as images/videos uploaded, disk storage consumed, training time per model and annotation tools used.
Users Management
We can specify three types of spaces:
- Organization - can contain multiple workspaces
- Workspace - can contain multiple projects
- Project space - lives within a workspace
Users Roles and Privileges for the application
Users can have one of the following roles:
- Organization contributor - a contributor can only view the list of members, they cannot add/remove new users to the organization.
- Organization admin - besides viewing application members, organization administrators can add/invite/remove users to/from the organization. This is also the only type of a user who can manage workspaces - add new, remove an existing workspace, assign users to a workspace. An organization admin can only be removed if there is another admin present in the organization.
Users Roles and Privileges for Workspace
Users can have one of the following roles:
- Workspace contributor - a contributor can only view the workspaces’ members, they cannot add/remove new users. Contributors can create/edit/delete projects that they created.
- Workspace admin - an admin can do everything a contributor can, assign/remove users to/from workspace, edit the names of the workspace members, and add/edit/remove projects. This user can be removed only if there is another admin present.
Users Roles and Privileges for Project
To add a user to the project, you must first create the user in the workspace or select the user that is already in the workspace.
Users can have one of the following roles:
- Project contributor - a contributor can only view the project’s members, they cannot add/remove new users. Contributors can create/edit/delete datasets, annotations, models, tests, and deployments.
- Project manager - a manager can do everything a contributor can as well as add/remove and edit the names of the project members. This user cannot be removed.
When a user creates a project, the system automatically grants a project manager role to this user for the created project. This project manager can add any user that has access to the current workspace to his/her project as project manager or project contributor. When a project is deleted, the system deletes all the users permissions related to this project.
You can also convert a non-admin user to an admin user provided that you have the admin privilege by clicking on ![]() next to the user and then Edit.
next to the user and then Edit.

Registering new users
If you hold an organization admin role, inviting or adding (depending on configuration) a new user to your team is straightforward. Begin by clicking Account on the home screen, followed by the Users tab. Here, you'll find the Send invite/Add user button; click it to open the registration form, which you'll need to fill out with the new user's information.
Ensure that all fields are filled in accurately. Once you save, the new user will be added to your team and gain access to the application, along with all team-related projects.