
Model Training and Optimization

You can configure and retrain your trained models in the Models screen after entering your project.
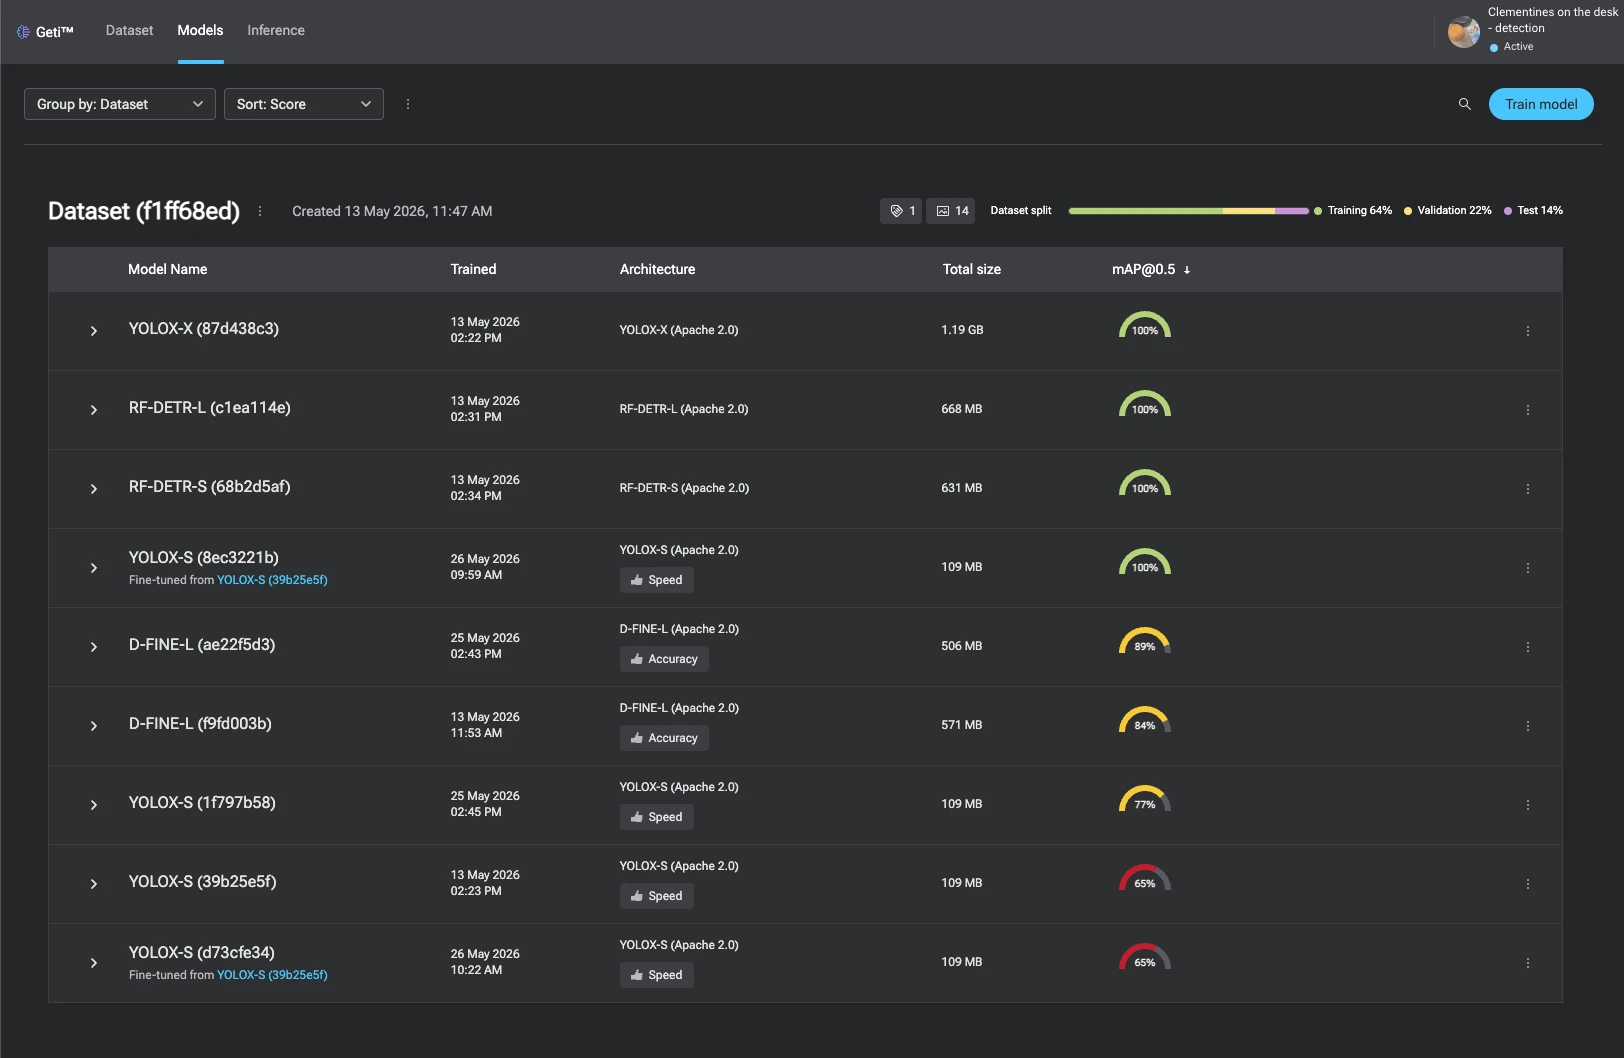
 On the Models' landing page, you will see all your active models.

Models page

Models page

In the home screen of Models, you can perform transfer learning (training a new model from the base model) by pressing Train model. It invokes a dialog with the settings to configure for training.

Note

Transfer learning it's a machine learning technique where a model developed for a particular task is reused as the starting point for a model on a second task. This is beneficial because it leverages pre-existing knowledge, reducing the amount of data and computational resources required to train a new model. In Geti™, transfer learning allows you to train new models from a base model, accelerating the training process and potentially improving model performance.

Train model

In this dialog you are allowed to select two types of training settings:

Basic settings (default)

In this view you can select one of the recommended model types:

  • Recommended for accuracy - produces a more accurate, but slower and larger model.
  • Recommended for balance - produces a model in balance with accuracy and speed.
  • Recommended for speed - produces a faster and smaller, but less accurate model.

Basic settings

Advanced settings

In this view you can configure specific settings for model training:

Architecture - select the model architecture you want to train a model with. It includes all available model architectures together with recommended ones. You can sort model architectures by relevance, architecture name, inference speed, training time and accuracy. Architecture

Data management - specify the distribution of annotated samples, define the criteria for annotations that will be used for training. Data management

Info

Image tiling is available in detection and segmentation projects.

Image tiling

Image tiling is a technique used to divide a large digital image into multiple smaller images or tiles. This approach is particularly effective for large-scale, high-resolution images, such as satellite imagery and aerial photographs, which often contain minuscule objects of interest. By breaking down images into smaller tiles, models can focus on detailed areas, improving detection accuracy for small objects. Note that when tiling is enabled, inference will involve additional computational complexity.

Info

Data augmentation is a technique used to enhance the diversity of data available for training models without actually collecting new data. This approach involves applying a variety of transformations to the training datasets to mimic the variability encountered in real-world scenarios. These transformations can include rotating, scaling, cropping, and altering the color of images. By increasing the diversity of the training data, data augmentation helps improve model generalization and robustness, making models more adaptable to new, unseen data.

For specific details on the augmentations applied to each model in the platform, read this document.

For now only classification project supports data augmentation.

Data augmentation

Training - fine-tune parameters, specify the details of the learning process. Training

Fine-tune parameters:

The original model is the starting point for your training process. It is the base version of the model that comes with pre-trained weights, typically trained on a large, general-purpose dataset. This model has already learned useful patterns and features from a broad dataset, which makes it a strong foundation for solving new, specific tasks.

When you choose Pre-trained weights – fine-tune the original model, you're starting from this original model and adapting it to your own data. This is called fine-tuning, and it helps you:

  • Save time.
  • Improve accuracy.
  • Avoid needing massive amounts of data.

If you select Previous training weights – fine-tune the previous version of your model, you're continuing from where you left off in a past training session. This is useful when:

  • You want to improve a model you’ve already trained.
  • You’re resuming training after a pause.
  • You’re iterating on a model with new data.

View model versions

You can also see the versions of your active model by clicking on the show more icon More to see the accuracy and the creation date of each model version.

Note

Model versions

Sometimes, you may notice that the system accepts a model with a lower accuracy than the previous model version. You may think that the selected model with the lower accuracy will perform worse. That is not the case. When the next version of a model is made the platform computes the performance of the new version based on the current dataset and also computes the performance of the old model on that new dataset.

For instance:

  1. Model 1 is trained on simple images and it shows performance of 100%.
  2. After training, active learning suggested more complicated images to annotate.
  3. Model 2 is trained on simple and more complicated images.
  4. The system collects the performances of model 1 and model 2 on the more complicated dataset.
  5. Let's assume, model 2 yields 90% while model 1 yields 60%. The system will accept model 2 as the latest model.

The model screen will show the history of the models with their respective dataset. In this example, the screen will show that model 1 has 100% performance and model 2 has 90% performance. Rest assured that the latest model performs better based on the latest dataset.

Change active model

If you have trained a couple of models with different architectures, you can change the active model between these architectures. When you change the active model, the model parameters configuration will be passed from a previously active model to a newly set active model.

If you have not trained any model yet, you can change the configuration that will produce the first model in the Models screen - click on Train model to do so. The Balance (SSD) model is set by default as active model before any training starts.

Model lifecycle

The Geti™ model lifecycle streamlines the integration of cutting-edge algorithms while ensuring the platform's maintainability. This lifecycle categorizes models into four distinct stages: Active, Deprecated, Obsolete and Deleted.

  1. Active Models: These models, designated as Recommended, receive full support. The system automatically selects the default model based on optimal performance across the initial 12 annotated images/frames. This selection process evaluates models for their balance, accuracy, or speed. Additionally, each model in the custom menu displays GFLOPs information, aiding in performance comparison.
  2. Deprecated Models: Tagged for eventual removal, these models are still available for training. They appear exclusively under the All model template tab and are not advised for new training projects. Deprecated models include details about their phase-out status, support termination timeline, and suggestions for alternative models. When existing models enter this stage, you will receive prompts to transition to newer models.
  3. Obsolete Models: Models in this stage either become invisible or unselectable in the model templates list. If you employ obsolete models, you will receive notifications on the Model screen, along with guidance to train with new models. Obsolete models are no longer viable for training or inference purposes.
  4. Deleted Models: These models are no longer available for any training or inference purposes. The binaries of the base model, optimized models generated from the base model, and exportable code are removed from the system. You will only be able to see the statistics that were generated for the model. This functionality can be used to save disk space. Deleting a model cannot be undone.

Model Details Screen

You can view more options for each of your model by simply clicking on the model of your choice. You will see the details for the model version you selected but you can switch between versions any time by clicking on the show more icon More in the Model breadcrumbs at the top of the screen.

Upon clicking on the model, you will land in the Optimized models tab from which you can select other tabs:

  • Model variants - where you can view all your models
  • Training dataset - where you can view the training dataset used for the model
  • Model metrics - where you can view the statistics for your model
  • Parameters - where you can view hyperparameters your model was trained with
  • Labels - where you can view labels your model contains

Model variants

Model variants

You will see your active model with the following information:

  • baseline model - the name of the model with which the Geti™ platform started training
  • license - the model license
  • precision - the numerical format (e.g., FP32, FP16, INT8) used to represent the model's weights and activations, affecting model size, computational requirements and performance
  • accuracy - the score of the model (measured in %) that indicates a ratio of correctly predicted observation to the total observations
  • size - the amount of storage capacity the model consumes
  • download button Download button icon - allows you to export the trained model

Variants and precision

  • OpenVINO - best for deployment on Intel hardware with a focus on optimized inference.
  • PyTorch - ideal for model development, training, and research, especially when flexibility and GPU support are important.
  • ONNX - suitable for interoperability and cross-platform deployment, allowing models to be used across different frameworks and environments.
  • FP32 offers high precision with 32 bits, allowing for a wide range of values and fine granularity. It is the standard format for most deep learning models during training. Ideal for training models where precision is crucial, such as when dealing with complex models or datasets.
  • FP16 FP16 provides lower precision than FP32, using 16 bits to represent numbers. It has a smaller range and less granularity. Suitable for inference and training when memory and computational efficiency are prioritized, and when the model can tolerate reduced precision.
  • INT8 INT8 uses 8 bits to represent integer values, offering significantly lower precision compared to floating-point formats. It is typically used for quantized models. Commonly used for inference in scenarios where speed and efficiency are critical, and where models can be quantized without significant loss of accuracy.
note

When you click on Start optimization, we will perform post-training optimization which outputs a INT8 OpenVINO model.

Post-training quantization (formerly known as POT - Post-Training Optimization Tool) is used for optimizing the model for inference. Post-training quantization is particularly valuable for deploying models in production environments as it offers several significant benefits:

  • Improved inference speed: Quantized 8-bit models can execute up to 4x faster than their full precision counterparts, making them ideal for real-time applications.
  • Reduced memory footprint: Quantization reduces model size by approximately 75%, requiring less storage and memory bandwidth.
  • Lower power consumption: Smaller, optimized models require less computational resources, extending battery life on edge devices.
  • Hardware compatibility: 8-bit quantized models are widely supported by inference hardware, including Intel CPUs, GPUs, and specialized AI accelerators.

All these benefits come with minimal impact on model accuracy for most computer vision tasks, making quantization an essential step in deploying efficient AI models.

Training dataset

Training dataset

In the Training dataset tab, you can see which images or video frames are used as part of a given subset. You can see the file information by hovering over the thumbnails and view the images or frames by clicking on the thumbnails.

The training dataset is split into three parts (subsets):

  • Training subset - the system will train on these items
  • Validation subset - used during training on which performance and optimization is validated
  • Testing subset - this subset is used to validate performance after training

By default, the split between these subsets depends on the dataset size. If there are less than 10 images, the split is (1/3, 1/3, 1/3). If there are between 10 and 40 images, the split is (1/2, 1/4, 1/4). If there are over 40 images, the split is (8/10, 1/10, 1/10). Most of the measures in the UI state on which subset they are computed (validation or test subset). In general, the score on a validation subset is higher since that is used to optimize the model.

After training a new model, the subset distribution remains unchanged even if manual modifications are made to the subset distribution in the configuration screen. To ensure that the modified distribution takes effect, it is necessary to adjust the distribution sets prior to training any model.

Model metrics

Model metrics

You can export all the metrics graphs in a PDF format or individually selected metrics graphs in a PDF or CSV format. To download all metrics graphs, click on Download all graphs in the top right-hand corner of the Model metrics panel. To download an individual graph, click on Download button icon in the in the top right-hand corner of the graph box.

Parameters

You will find here hyperparameters that were used to train the model. Model parameters